Getting Started With Obsidian MD
An Enthusiast's Guide to building your Digital Brain


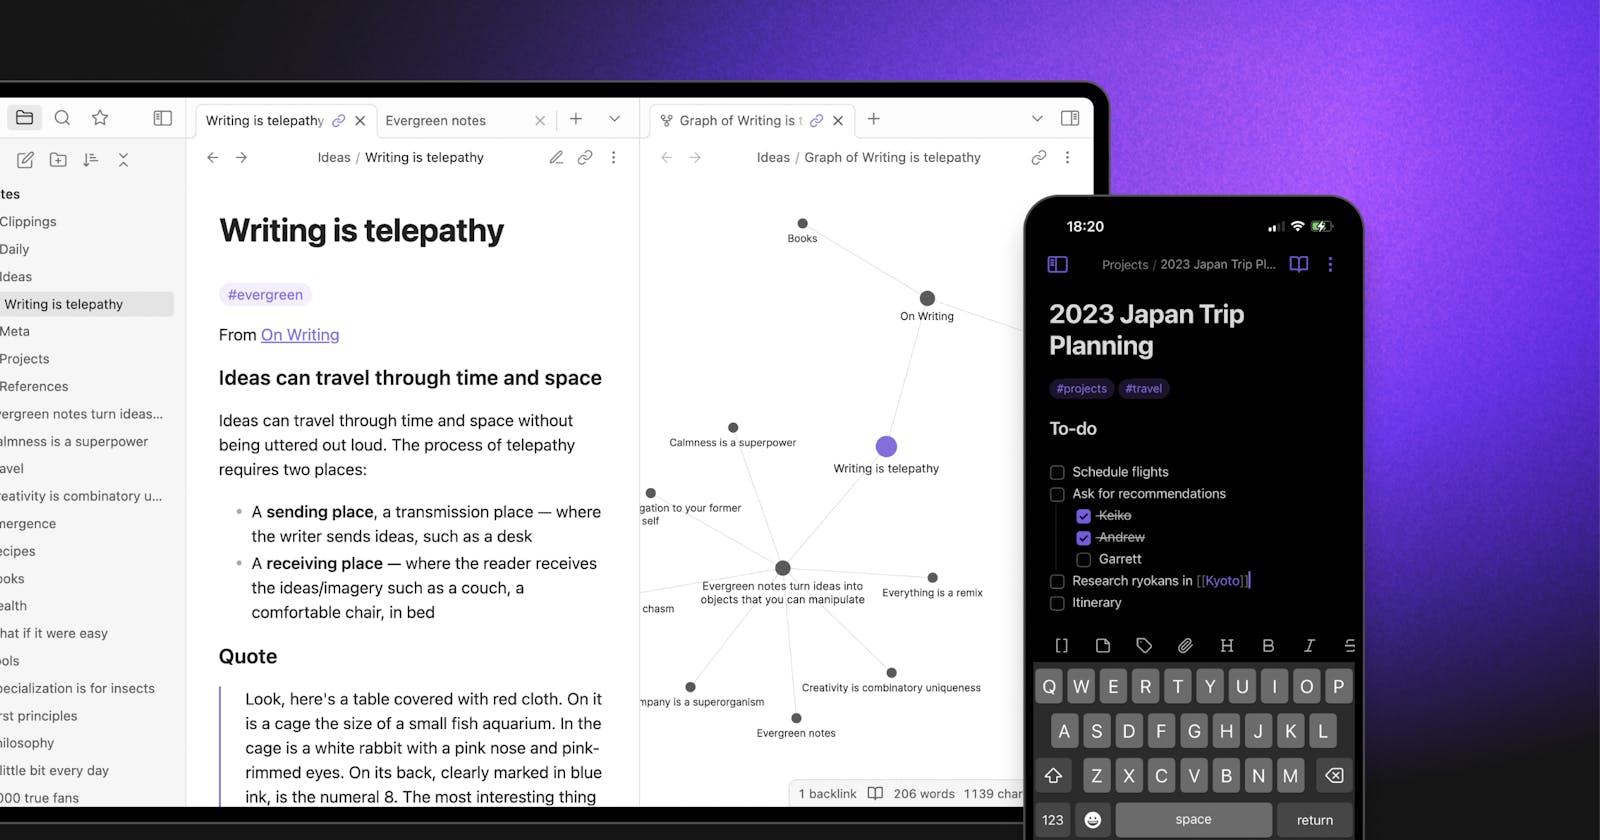
Table of contents
- In everyday life, we need to constantly keep ourselves reminded of important information.
- Installation
- Creating New Files
- Linking Pages
- Linked & Unlinked Mentions
- Tags
- Text Styles
- Titling Your Notes
- Dividers
- Modes
- Note Searches
- Moving Forward & Backwards
- Keyboard Short Cuts (aka HOT KEYS) {Compiled}
- Graph View
- Exporting To PDF
- Must-Have Plug-ins & Settings
- Happy Writing! + My Tips
In everyday life, we need to constantly keep ourselves reminded of important information.
Some people write this information on Post-it notes, notebooks, or using programs such as Microsoft Word or Google Notes. The problem is, that information is in itself transitive- one piece of data or a note can lead to another one and it can become cumbersome and difficult to follow the trail of information.
Our brain works the same way, usually, we store information by association- to remember a fact, we try to think, for example, of where we learned the fact, or who told it to us, and follow the links to the information we try to remember.
Obsidian.md is a handy program that works the same way as our brain- it uses links to connect pieces of information together, for easy retrieval and memorization. It is based on he Markdown language, which is a light-weight language used for writing and formatting plain text documents. The tool expands on the Markdown language by adding extra functionality, such as creating links between files, offering "hover over preview" of links and easy inclusion and management of sources.
Just like Roam Research and RemNote, Obsidian allows you to "tend to your notes like a gardener", thanks to the way they are displayed in your own knowledge graph. Further, our thoughts and ideas will gain value over time. We can externalize your ideas. When we link, we remember more as well and can have more engaging conversations, more insightful writing, and see the novelty in simple thoughts.
You can also find a more thorough article (with images) in my Notion here.
On a time crunch? Here is the Summary
Installation
Go to Obsidian.md and download the app. Then follow the procedures on the screen and launch the product!
Creating New Files
Navigate to the Top Left corner of the screen and click the “New Note” button. Rename it according to what the file will be about.
Or the less obvious, but faster way is Ctrl/Cmd + N ****{N for New Note}
Linking Pages
Use TWO Square Brackets to Link pages together
Ex: [[ Name of File ]]
Ex:
Hello, I am a note that has cool ideas about projects and knowledge.
Hello, I am a note that has cool ideas about projects and knowledge.
Hello, I am a note that has cool ideas about [[projects]] and [[knowledge]].
Hello, I am a note that has cool ideas about projects and knowledge.
P.S.1 Click on the underlined text to actually produce the note and navigate to it.
P.S.2 Obsidian is smart. You can use smart search.
Ex: You want to search for one of your notes to add from {Computers, Computer Systems, Computer Management, Work Balance, A Builder’s System}. Let’s say you are looking for “Work Balance”.
1. Click “[[”
2. Start Typing “Wor...”
3. Instantly auto searches
But this isn’t that smart... You are still looking for “Work Balance”:
1. Click “[[”
2. Start Typing “W...A...E...”
3. “Work Balance” Note shows up! Why? Because it has ‘W’, ‘A’, and ‘E’ in its title.
Searching Short Cuts:
Ctrl/Cmd + O {Note Switcher}
Ctrl/Cmd + Shift + F {Note Finder}
Linked & Unlinked Mentions
Obsidian allows for backlinks, letting writers know just HOW their ideas are linked (forward and backwards). AKA bi-directional linking.
On the right side of your screen, a “Linking” icon can show you types of note mentions and dependencies.
Linked mentions are when you explicitly link to a page using the [[Note]] format.
Ex: You create a page called “Bitcoin”.
In your “Bitcoin” Note, you come across NFTs and decide that it is a huge topic on its own so you use “[[” to make a new page. Then you click on it to produce it.
🖇️ You have successfully LINKED the two pages together.
Unlinked mentions are when you mention the page in another note but you don't directly link to it.
Ex: You have created a page called “Bitcoin”.
In your “Bitcoin” Note, you mention NFTs many times but they are not notes—just plain text.
🖇️ You have simply MENTIONED a reoccurring idea, NOT LINKING the pages together.
Tags
Tags are used as a way to group notes that share a similar theme. It does not result in the creation of a new note. Instead, it is used as a convenient search tool.
Use “#” DIRECTLY in front of a tag word
Ex:
#concept
P.S Use Ctrl/Cmd + Click to generate a search on the tag word
Text Styles
Italics
Add Asterisks “*”
Ex: This gives me *real value*****.
Bold
Add Double Asterisks “**”
Ex: Look up, **this is you**.
Lists & Bullets
Use Hyphen “-”, then hit the space bar
Use One Asterisk “*”, then hit the space bar
Start typing numbers “1.”, then hit the space bar
Ex (Hyphens):
- Item 1
- Item 2
- Item 3
Ex (Bullets):
Item 1
Item 2
Item 3
Ex (Numbers):
Item 1
Item 2
Item 3
Titling Your Notes
Use “#” and hit the space bar BEFORE your title
Header 1
#This is a Title
Header 2
##This is a Smaller Title
Header 3
###This is an Even Smaller Title
Dividers
Adding dividers to organize your notes is sometimes necessary.
Type a couple underscores “_____”
Modes
2 Types (Preview & Editing)
To toggle between Preview and Editing Modes, use Ctrl/Cmd + E
Update: You can now choose to display Live Preview while editing. This eliminates the use of having a toggle. This can be turned on in Settings → Editor → General → Default Editing Mode
Preview Mode
Allows you to view your notes without making changes.
Editing Mode
Allows you to edit your notes.
How to know if you are in Editing Mode?
You will be able to see the “behind the scenes” of your file.
Ex:
“#” in front of titles and grey text in front of numbered lists
Note Searches
Quick Search for Notes
Ctrl/Cmd + Shift + F
Search AND Switching for Notes
Ctrl/Cmd + O
What about running a tag search?
Ctrl/Cmd + Click on Tag
What is a tag again?
Tags are used as a way to group notes that share a similar theme. It does not result in the creation of a new note. Instead, it is used as a convenient searching tool.
Use “#” DIRECTLY in front of a tag word
Ex:
#ThisIsATag
Moving Forward & Backwards
Obsidian does not have huge back/forward buttons in the app so, use these shortcuts to move into previously opened notes or recently created ones!
Moving Forward
Ctrl/Cmd + Opt + Right Arrow
Moving Backwards
Ctrl/Cmd + Opt + Left Arrow
Keyboard Short Cuts (aka HOT KEYS) {Compiled}
New Note
Ctrl/Cmd + N
Creating a Link
Type “[[”
Open Note (in new pane)
Ctrl/Cmd + Click on Note
Open an existing link in editing mode
Ctrl/Cmd + Click on Link
Quick Search for Notes
Ctrl/Cmd + Shift + F {Note Finder}
Search AND Switching for Notes
Ctrl/Cmd + O {Note Switcher}
Search on Tags
Ctrl/Cmd + Click on Tag (ex: #Concept)
Preview and Editing Mode Toggle
Ctrl/Cmd + E
Moving Forward {In Editor}
Ctrl/Cmd + Opt + Right Arrow
Moving Backwards {In Editor}
Ctrl/Cmd + Opt + Left Arrow
Creating Your Own Keyboard Shortcuts (hotkeys)
Navigate to Settings → Hotkeys. Here you can choose what functionalities correspond to specific key combinations to accelerate your thought-linking process.
Graph View
Shows a graph representation of the internal links between your notes.
Notes with more notes referencing it appear as bigger nodes on the graph, which you can fully interact with. Each note also comes with a “Local graph” (appears in the right panel) that displays nodes that are connected to it.
Exporting To PDF
Navigate to the “Open Command Palette” Button on the left side of your screen. From there, a dialogue box appears, where you can search for a specific command (or select one from a list). Select “Export to PDF”.
Must-Have Plug-ins & Settings
Navigate to the “Gear” icon (Settings).
This will open a list of items that can be turned on/off based on your preferences. Navigate to “Core Plugins”.
Turn on the following Plug-ins:
Tag Pane
Page Preview
Starred Notes
Tag Pane
Displays your tags and the number of occurrences on the right bar of your Obsidian Vault
Page Preview
Generates a preview when internal links are hovered on. If on editor mode, press Ctrl/Cmd while hovering
Starred Notes
Favorite critical notes that can be referred to easily from the left panel.
Additional Plug-ins (Based on Your Preferences):
Daily Notes
- Automatically generates a new file per day.
Slash Commands
- Enables the ability to see commands in the editor by typing “/” (Similar to Notion).
Community Plug-ins
These are not necessary but are plug-ins that were developed by Obsidian users and the community. You can turn these on in the settings and browse through some that are useful to you, but are by no means required to start journaling!
Some Community Plug-ins I use:
Calendar (!!!)
Displays a calendar in the sidebar to click and see notes made on certain days
Used with Daily notes
It can also prompt the creation of a new Daily Note
Dots appear under each day in the calendar view to indicate the amount of text in the note and whether there are any unfinished tasks linked to that date
Note Refractor
The idea behind Plug-in: it is important to link big ideas into their own notes
Takes a selection of text and breaks it out as its own note
Simultaneously puts a link into the original note and points to a new note
The new note is also visible in the local graph
There are a lot more -- Just give it a Google Search!
Tip: You can always edit these in settings and look through Plug-in options for downloaded plug-ins.
Now navigate to “Files & Links”
Automatically Update Internal Links
Turn on “Automatically Update Internal Links”. This automatically updates the names of all dependent files that have been modified or renamed.
Now navigate to “Appearance”
Appearance
Don’t like the way your vault looks? Don’t worry about it!
Switch between Dark and Light Mode or a number of community developed themes with custom colours and styles.
Happy Writing! + My Tips
Look at you! You made it to the end 🙂 . Now that you are equipped with the technical skills, make sure you START implementing them.
The biggest obstacle in starting a new task, is starting itself.
If you are just beginning (i.e. no prior journaling experience) to use Obsidian, I recommend using the “Daily Note” Plug-in and building by journaling your day-to-day. Then as you list your daily activities, you can make new pages {”[[”} based on cool things you did or heard or thought of!
Not good enough for me... I WANT MORE!
Visit Obsidian Help, there’s a LOT here.
...maybe too much?
Happy Writing and feel free to tag me on Twitter (@shreeyaapatel)! You can also find a more thorough article (with images) in my Notion here.